本博客修改日志(倒序) 从上往下,依次时间回溯,下方的修改内容是最近一次修改。
主题名称:Volantis1.7.4 1.6.0
看腻了?换个字体 ~\Volantis\themes\volantis\layout\_partial\head.ejs 1 2 3 4 5 6 ... <!--font--> <link rel="stylesheet" href="//fonts.googleapis.com/css?family=Ovo|Source+Code+Pro" > </head>
~\Volantis\themes\volantis\source\less\_fonts.less 1 2 @fontfamily_base: "Ovo" , "Georgia" , "STZhongsong" , "Microsoft YaHei" , serif;
引入子主题 https://www.cxmoe.com/words
欢迎访问。
添加点击、气泡特效 ~\Volantis\themes\volantis\layout\layout.ejs 1 2 3 4 5 6 7 8 9 ... <canvas class "fireworks" style="position: fixed;left: 0;top: 0;z-index: 1; pointer-events: none;" ></canvas> <canvas id="header_canvas"style="position:absolute;bottom:0;z-index: 1;width:1366;height:400"></ canvas> <script src="//cdn.bootcss.com/animejs/2.2.0/anime.min.js" ></script> <script async src="https:/ /cdn.jsdelivr.net/g h/TianZonglin/resource/explosion.min.js"></script> <script async src=" https:</body> </ html>
修改新年颜色
直接全局替换 #2196f3 to#ff0000,换成过年的大红色,之后可以再替换回来,前提是你的主题内原先没有其他的标签是#ff0000 这个颜色,否则换回来就乱套了。
其他:
网站LOGO红色版、Rating插件第三方改颜色
1 2 3 4 5 6 7 8 9 10 11 12 13 14 15 16 17 18 19 20 21 22 23 24 25 26 27 28 题头 //_config.yml 地图 //qrcodeMap.ejs layout.ejs <div class="phoneXX" style="margin-top: 15px;"> <center><span id="btnV" style="color:#c99d9d;font-size:16px;cursor:pointer;">↑ 画面不动?没声音?点这里!(<a style="text-decoration: none;color:#c99d9d;" href="/article/9cb3.html">教程</a>)</span></center><!--#676767--> </div> less/_base.less body { background-color: #c00000;//////////////@theme_background; /*background-image: linear-gradient(#c00000, #111f4c, #c00000); 标准的语法(必须放在最后)background-image: linear-gradient(#000000, #111f4c, #000000); */ } footer.ejs 删掉地球 qrcodeMap.ejs <%- partial('_pre') %> <section class="widget <%- item.class %> <%- page.widget_style %> <%- page.widget_platform %>"> <%- partial('header', {item: item}) %> <div style='padding:5 5 5 5;background-color:#ff0000; border-radius: 8px;'> <div style="width:210px;height:143.5px;z-index:100;background:#fff;position:absolute;left:0;top:0;filter: alpha(opacity=0.01); -moz-opacity: 0.01;opacity: 0.01; "></div> <div style="z-index:1;position:relative;display:inline-block;width:209.6px;"> <!--<script type="text/javascript" src="//rf.revolvermaps.com/0/0/7.js?i=51glt95x6ef&m=0c&c=ff0000&cr1=54ff00&crb1=54ff00&br=12&sx=0&rs=100&as=100&ds=0&cw=ffffff&cb=219@6f3" async="async"></script>--> <script type="text/javascript" src="//rf.revolvermaps.com/0/0/7.js?i=51glt95x6ef&m=0c&c=00b9ff&cr1=fff600&crb1=000000&crh1=fff600&sx=0&rs=100&as=100&rg=100&ds=0&cw=ffffff&cb=ff0000" async="async"></script> </div> </div> </section>
主页置顶区域(豆瓣影评) ~\Volantis\themes\volantis\layout\index.ejs 1 2 3 4 5 6 7 8 9 10 11 12 13 14 15 <%- partial('_pre' ) %> <div class 'l_main<%- page.sidebar == false ? ' no_sidebar' : ' ' %>' > <article class "post white-box reveal " > <section class "article typo" > <div class "article-entry" itemprop="articleBody" > </div> </ section> </article> / /从以下开始即主页文章列表 <%- partial('_partial/ archive') %> </div> <%- partial(' _partial/side') %> <%- partial(' _partial/footer', null, {cache: !config.relative_link}) %>
该部分作为豆瓣影评页在首页的载体;
亦可自定义其他非模板md文章的内容;
关于首页影评卡片,由于实现比较复杂会在近期单独写文章讲解。
基本思路:
利用 hexo-douban 插件的“已观看”部分(魔改),将缺失短影评且有长影评的记录补全,最后生成完整的豆瓣影评页面 。然后利用 load 方法将影评页的部分内容(排序首位的影评)加载到首页中,最后再通过媒体查询完善一下样式自适应,即完成实现。
注意事项:
生成(hexo g)豆瓣页面时次数过多会导致IP被封禁,次日解禁(用代理/换IP可解)。另,可以不设置生成影评的部分为 built-in 模式,这样就不会影响原始正常的 hexo g 过程。
B站视频自适应样式 Bilibili format 1 2 3 4 <div style ="position: relative; width: 100%; height: 0; padding-bottom: 75%;" > <iframe src ="//player.bilibili.com/url" scrolling ="no" border ="0" frameborder ="no" framespacing ="0" allowfullscreen ="true" style ="position: absolute; width: 100%; height: 100%; left: 0; top: 0;" > </iframe > </div >
首页新增近期动态幻灯片 ~\Volantis\themes\volantis\layout\layout.ejs 1 2 3 4 5 6 7 8 9 10 11 12 13 14 15 16 17 18 19 20 21 22 23 24 25 26 27 28 29 30 31 32 33 34 35 36 37 38 39 40 41 42 43 44 45 46 <%- partial('_partial/cover' ) %> <!-- 接续在cover后面... --> <% if (is_home()) { %> <style> @media(max-width: 1100 px) { .ctrl {display :none; } } </style> <script type="text/ javascript"> function changeFrameHeight(){ var iframe= document.getElementById(" myiframe"); var wid = document.getElementById('father').clientWidth; if (wid>900) iframe.height = wid/2.2; else if (wid>551) iframe.height = wid/2.22; else if (wid>470) iframe.height = wid/2.175; else iframe.height = wid/2.26; } window.οnresize=function(){ changeFrameHeight(); } </script> <div class=" ctrl1"> <div class=" l_body"> <div class=" body-wrapper"> <div class=" l_main" style=" width: calc(100 %); padding-right: 0 px;"> <section class=" post-list "> <div class=" post-wrapper"> <article class=" post white-box reveal "> <div class=" meta" id=" header-meta"> <h2 class=" title"> <a href=" /article/1 c44.html"> 光影记忆////近期手机相机存货 </a> </h2> </div> <style>iframe{pointer-events: none;}</style> <div style=" background-color: rgb(0 , 0 , 0 );padding-top: 7 px;" id=" father"> <iframe width=" 100 %" id=" myiframe" frameborder=" 0 " onload=" changeFrameHeight()" src=" https: </div> </ article> </div> </ section> </div> </ div> </div> </ div><% } %>
恢复原来的标签网络 原本是在旧站点挂的一个页面,更新主题后一直没恢复,现在重新搞了一下恢复了。具体思路和代码实现可以参见我之前写的以下文章。
该页面 的最终效果:
文章页结束后加入评价 参考自雪曦的文章哦。
步骤:去 widgetpack.com 完成注册,然后找到 Rating 在 Setting 中设置为 IP Address。
然后将 Install 中的代码块插入主题代码中。具体位置如下,不需要额外配置,代码中已经包含ID。
~\Volantis\themes\volantis\layout\_partial\archive.ejs 1 2 3 4 5 6 7 8 9 10 11 12 13 14 15 16 17 18 19 20 21 22 23 24 25 26 27 28 29 30 31 <% var sections = page.body ? page.body : theme.layout.on_page.body; %> <% sections.forEach(function (widget_id ) <% if (widget_id == 'article' ) { %> <article id="<%= post.layout %>" class "post white-box <%- theme.style.shadow.card ? 'card-shadow' : '' %> <%- theme.style.blur && theme.style.blur.body ? 'body-blur' : '' %> article-type-<%= post.layout %>" itemscope itemprop="blogPost" > <%- partial('meta' , {post : post, position : 'header' }) %> <section class "article typo" > <div class "article-entry" itemprop="articleBody" > <% (post.photos||[]).forEach(function (photo ) <fancybox><img src ='<%- url_for(photo) %>' /> /fancybox> <% }) %> <%- post.content %> <!-- 五星评价代码,紧跟在Content之后 --> <center><br><br> <div id="wpac-rating"></ div> <script type="text/javascript" > wpac_init = window .wpac_init || []; wpac_init.push({widget : 'Rating' , id : 24440 }); (function ( if ('WIDGETPACK_LOADED' in window ) return ; WIDGETPACK_LOADED = true ; var mc = document .createElement('script' ); mc.type = 'text/javascript' ; mc.async = true ; mc.src = 'https://embed.widgetpack.com/widget.js' ; var s = document .getElementsByTagName('script' )[0 ]; s.parentNode.insertBefore(mc, s.nextSibling); })(); </script> <b><a href="" class="wpac-cr">留下您对该文章的评价</ a></b> <br><br></ center> <!-- 原内容继续... -->
效果:
主题调整为灰色调 主要修改一处主题样式,并且补充修改其他几个自定义页面。
1 2 3 4 5 6 7 8 9 10 11 12 13 /* 在source\less\_base.less中添加 */ html { -webkit-filter: grayscale(100%) !important; -moz-filter: grayscale(100%) !important; -ms-filter: grayscale(100%) !important; -o-filter: grayscale(100%) !important; filter: grayscale(100%) !important; } /* 以下自定义页面中同样添加上述代码 */ - theme\volantis\source\csc\index.html - theme\volantis\source\monitor.html - theme\volantis\source\maps.html - theme\volantis\source\cv.html
效果:
修改主页下拉图标不居中
~\Volantis\themes\volantis\source\less\_base.less 1 2 3 4 5 6 7 8 9 10 11 12 13 14 15 16 17 18 19 20 21 22 23 24 25 26 27 28 29 30 31 32 33 34 .scroll-down { width: 1.5%; // 100%; //height: 64px; position : absolute ; bottom : 30px ; // text-align: center; cursor : pointer ; .scroll-down-effects { color : white; font-size : 24px ; line-height : 64px ; position : absolute; text-shadow : 0 1px 2px rgba (0 , 0 , 0 , .1 ); @keyframes scroll-down-effect{ 0%{ top : 0 ; opacity : .4 ; } 50%{ top : -16px ; opacity : 1 ; } 100%{ top : 0 ; opacity : .4 ; } } animation : scroll-down-effect 1.3s infinite ; transform : rotateX (20px ); } @media(max-width: 768px){ width : 5%; } }
其他小修改: 主页Cover背景只保留一个页面宽度,另外页面主体背景颜色改为和背景图片相连续的颜色。
添加单独的页面访问统计 详见:
引入基于L-Cloud的页面访问统计
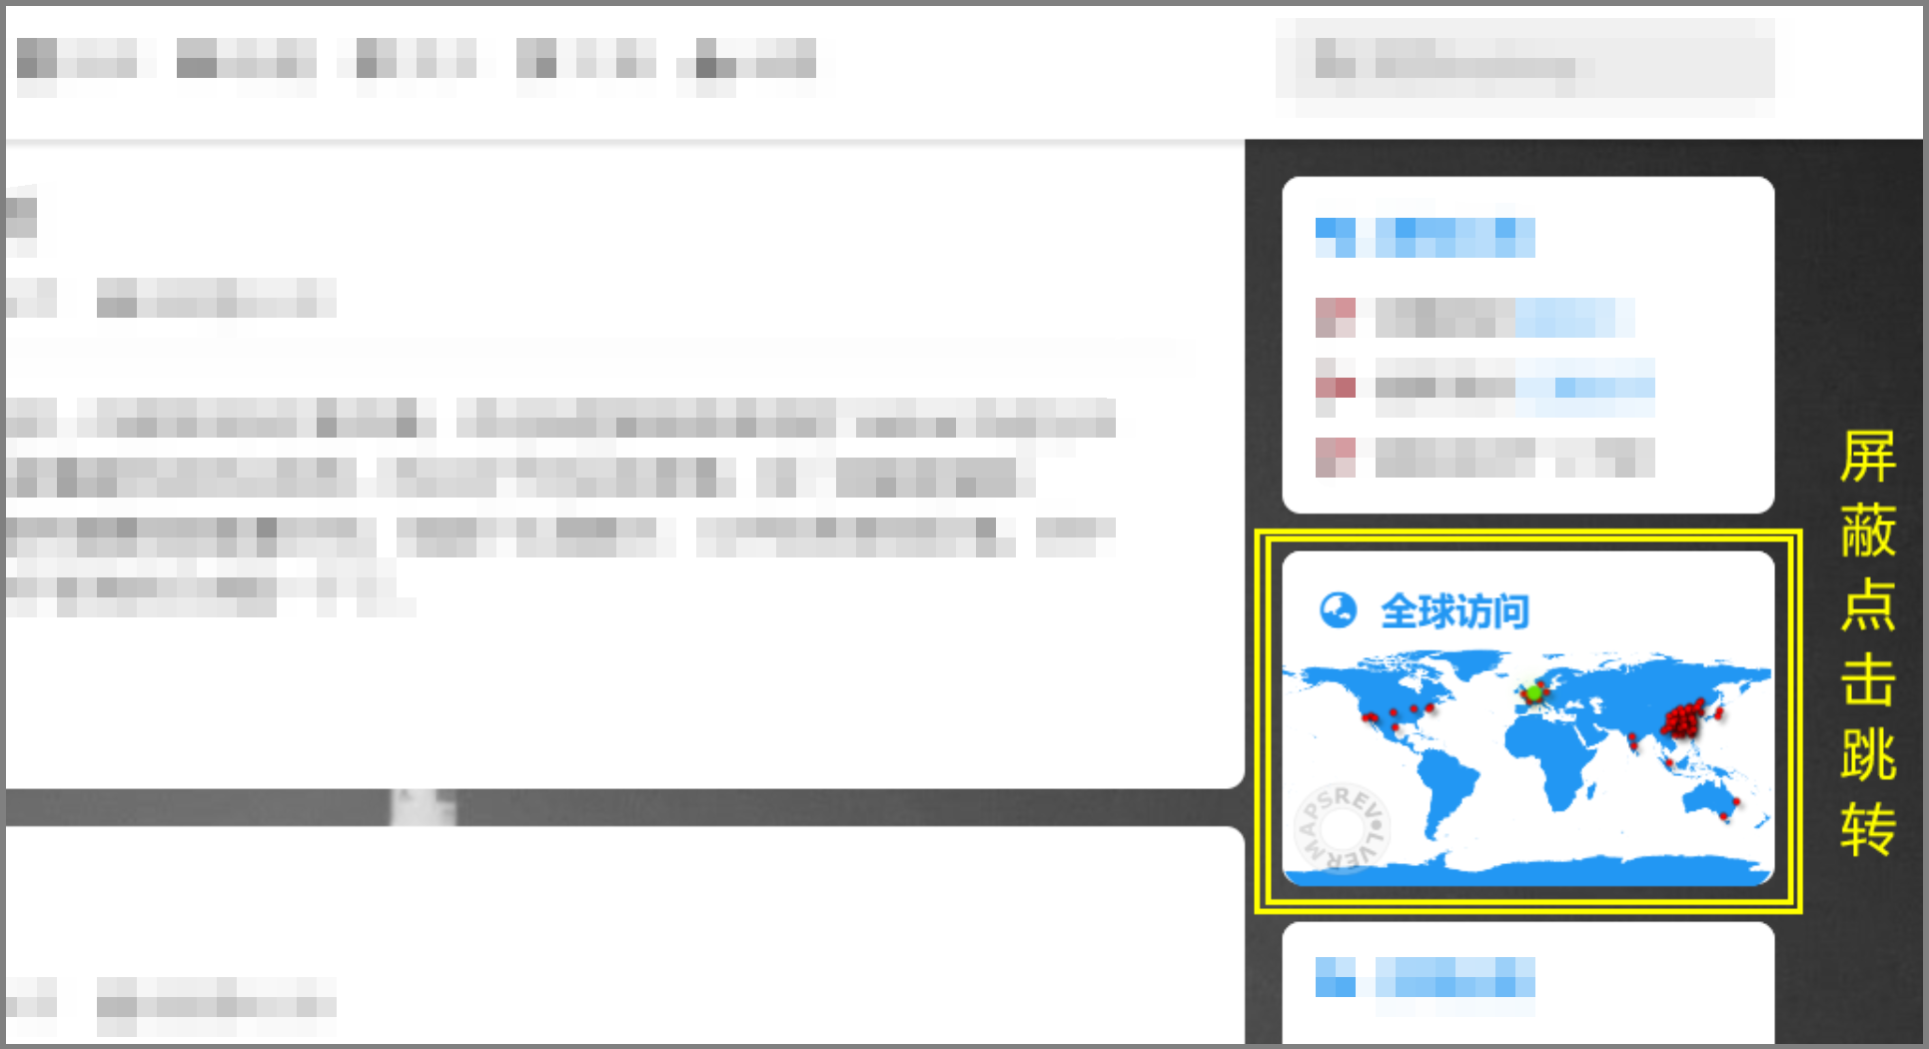
屏蔽访客插件点击 以下插件(revolvermaps )是用来实时显示访客位置的,精度还可以,而且也比较直观,但唯一不足的是:任何人都可以点击插件区域进入后台IP界面(不带跳转是它的付费功能!)
巧妙的解决方式:遮罩屏蔽
新建个相同大小的div块,然后重叠放置在原插件上面(利用z-index),背景设置成透明即可。代码如下:
~\volantis\layout\_widget\qrcodeMap.ejs 1 2 3 4 5 6 7 8 9 10 11 ... ... <!--遮罩部分--> <div style="width:210px;height:143.5px;z-index:100;background:#fff;position:absolute;left:0;top:0;filter: alpha(opacity=0.01); -moz-opacity: 0.01;opacity: 0.01; " ></div> ... ... <!--地图插件部分--> <div style="z-index:1;position:relative;display:inline-block;width:209px;"> <!--原始插件代码--> <script type="text/ javascript" src=" </div> ... ...
内嵌页访问模式 这是针对几个自定义页面祭出的访问方式,主要有几点考虑:
不跳出本站。某些网页非本站域名,且无法修改,正常情况下访问就会跳出网站;
页面访问量更准确。类似第三方监控这种页面,可以通过内嵌页方式将访问统计在本站访问量之内;
方便返回。跳出网站后极易流失访问者,内嵌方式可以强调返回功能。
实现方式:iframe 内嵌。
Logo增加文字:
使用的艺术字生成网站为 Zitiweb ,此网站的优势是生成的字体可以选择透明 背景。
修改相关文章的部分 ~\volantis\layout\_widget\related_posts.ejs 1 2 3 4 5 6 7 8 9 10 11 12 13 14 15 16 <style> .popular-posts{margin-left: 21 px !important;} .popular-posts a{padding-left: 0 px !important;} </style> <% if(page.layout == 'post' && page.content && page.path != undefined){ %> <%- partial('_pre') %> <section style="background-color: #f2f2f2;padding-bottom:5px;" class="widget <%- item.class %> <%- page.widget_style %> <%- page.widget_platform %>"> <header style="background-color: #f2f2f2;padding-left: 5px; display:inline-block !important;"> <i class="fas fa-bookmark fa-fw" aria-hidden="true"></i ><span class ="name" > 相关文章</span > </header> <div class="content" style="background-color: #f2f2f2;margin-top: 0px;"> <%- popular_posts( { maxCount: item.max_count , ulClass: 'popular-posts' , PPMixingRate: 0.2 } , page ) %> </ div> </section> <% } %>
更新主题版本1.7.4 未完全修改原主题(1.7.4)中的以下更新:
因为该更新去除了下拉页面时顶栏的翻转变换,我觉得这功能挺好的,故保留之。
在这一次 版本更新中,作者重写了Footer,由于我也在自定义修改Footer,所以就只修改了部分内容,没有更新作者的配置文件修改等内容。以下是老版本和新版本混合的结果,只是为了保留新版本的aplayer代码。
注意:如无必要一定要将上述更新全部完成(theme.aplayer.enable改为theme.footer.aplayer.enable),否则会导致aplayer出现问题。
~\volantis\layout\_partial\footer.ejs 1 2 3 4 5 6 7 8 9 10 11 12 13 14 15 16 17 18 19 20 21 22 23 24 25 26 27 28 29 30 31 32 33 34 35 36 37 38 39 40 41 42 43 44 45 46 47 48 49 50 51 52 53 54 55 56 57 58 59 60 61 62 63 64 65 66 67 68 69 70 71 72 73 74 75 76 77 78 79 80 81 82 83 84 <% if (theme.footer) { %> <% var layout = theme.footer.layout; if (config.theme_config && config.theme_config.footer && config.theme_config.footer.layout) { layout = config.theme_config.footer.layout; } %> <footer class "clearfix <%- theme.backstretch && theme.backstretch.is_dark ? 'white' : '' %>" > <br><br > <div class="social-wrapper"> <!--in--><a style="margin-right:15px;margin-top:2.5px;" href='https://cn.linkedin.com/in/tianzonglin' ><img width="20px" src="data:image/png;base64,iVBORw0KGgoAAAANSUhEUgAAADIAAAAyCAYAAAAeP4ixAAAABmJLR0QA/wD/AP+gvaeTAAAB6klEQVRoge2YP08bMRyGn19p1aVKCkIdUYf2I3SsGKkECFakrowdgA/QhaJO+SCdkKDZyj8x9hN0KRNC/UMRyYh4GWAIF98l9iXOlfiRbjj7tf2+57N9CSQSiSAkLUk6kNTW6GlL2pe06Bvi82h9F/LJ5dlcMwFsh81jNBbNbLez4JFDtBbJTBnWswWuGWkBz6LYCadlZrXOAlcQxfMTjpnd8+56tf5LxjbIGbACTN9d74HfgzY1EHrs4XMO/dKwDw4XWR++i71uZpcZfR24CHloZSi72GcdZW/D7QwO3xn5A2wAzbv7OaABvBi8tWKyM5LOkaoxnkEsB0/NMbdn0QzwFKgBb4CPwN9ycTrw2btdbQo0vyS96zH2c0nNkHMkZpBXPQe/1T2WdOQbxGvXyr5GrjZ5Gh8kvQR+AE/69TKSxS5poqjezE6ALz59Rg0i6YOkU+BK0k9JqwXyZkFdX4MNa40s53S7kKN/HeIlRpDDnG4PcvR1Hy/RFrukc2DSUfXPzKYcegOu+/USM0ipfnu1Gc9PlCqTglSNFKRqpCBV48EESf+iVA1XkHZ0F/5cZgtcQb5HMFKWLo+uII0IRsrS5bEriJntAFtR7ISxaWZf+1ZLWpC0J6lV9EstEi1J3yTND/EBJRIPmhu/Z0SR8AyW3wAAAABJRU5ErkJggg=="></a> <!--github--><a style="margin-right:15px;margin-top:0.5px;" href='https://github.com/TianZonglin' ><img width="22.5px" src="data:image/png;base64,iVBORw0KGgoAAAANSUhEUgAAADIAAAAyCAYAAAAeP4ixAAAABmJLR0QA/wD/AP+gvaeTAAAEF0lEQVRoge2Zy29VVRTGfwvKQxQMEqAoBqMBhYkhiJHgIw6M4iNxYsSJRolBRR0aTY2JE+M/4BgnTgwJE4gBiSEaRWqQRCuJoE6Qtlhp1dry7udgn3s5Pd3rsM+9t9eS3C9pbrruenzf3ufuvfbZ0EEHHXRwLcHKvpR0FBgB9gK7zey3trC6Uv8O4GngCWCxma1vJMlGTcZlSXskPSKpdACagSTLauzNauaxoZGE78tHn6StrRSUCdgq6aeSuu81kvirkoQ1HJZ0XwtEbJLUm1DvoJcjOqLZSP8FLErgMQF8BPSY2aikbmANsBBYkH0CjALj2edxMxuUtBD4AHgNmJVQa8TMbqoi5Bbg94TEeQwBXcDiRP9h4DKwtGKdbjM7XTR2Oc5rKyaH6oSiI5uAtcAUId50LmuwSDsQHTBPyHXTSKRZzI8ZPSHeIzcTMCdm9IT8MY1EmsWfMaMnZMs0EmkWTyZ5SXo+YWP6v7GtyNsKIm4GThA2spmMMWC1mQ3UDMVH611mvgiA64GevKE+I5KWAP3A3DaTahQXgBVmNgyTZ+Qxrh0RELg+WvsnL+Tx9nNpGnXO+Y3vropJLhJ6nguETeoG0hvGGkaAf7Ncc4HlOBueg3pPmBeS0l/9TWjZPwWOmdnFooNCa76A8INcxJV25yzwD2HFGTez0UjsHGAd8Cywg6sfI5ZPsUg6f5W1+4ikVQliWwJJq7KaZTgXCxwrCTghqWqb3goxyyT9UsJrLBY0WBLwYLtF5Hg9VMKrPxZw3HE+UFLkVUmns0HYXpGgSeqRdDL7e0fOywxJXzjcfo45f+4473CSPyBpIuc3Ien+CkJeitR6wfF9w+G2r+aT30f6nJo/OvY3mdyrWWZLRWwGX6nIoc45L+QHx3nYsW9MtHlYE7Hd6fiecex1znkh+wFFnL1j79Q1HLod3xhip9B5jm+MwwSBM5ATYmangO8iASuc5FPeZACDjm8MMd/o6c/h0FvWxu+MBNztJI+Jjtk8HIzYDju+MQ4xrgGS5kvqL6wMhxzfZletzYV4SXrK8f224HdKkvcY1oO2RZa5ex3f7Qp7yICkl1NF5OJflzSksBe95fgUbwUk6cWU5Cbps0Jgr0JD11ZI6pJ0qMBlT5UESyQdKyT4RFLb3ndJmi3p4wKHPknVjgqSbo2I+VLS6mninq99m6QDERErG014o6TdhYTns9nZ0soZkjRL0sOSdkoaL9TcJan0bJJ04yTpGeBD4PbCV2eAI8D3hHahn/CWcohw6jtnZmezHPMIB67ZhBfRSwn7wzpgA3APUzfZX4G3zWxXCs8kZD+85yTtl3RJ04dLkvYpXMMlz3hDd4DZNG8CNgPrgZWE0a0dc1NQu70aIFwqHQW+Br6JHYM76KCDDgD4D6z9hVuzmv/gAAAAAElFTkSuQmCC"></a> <!--ins--><a style="margin-right:0;" href='https://www.instagram.com/tzloop/' ><img width="24.3px" src="data:image/png;base64,iVBORw0KGgoAAAANSUhEUgAAADIAAAAyCAYAAAAeP4ixAAAABmJLR0QA/wD/AP+gvaeTAAADgUlEQVRoge2Zz28WRRjHP0PFkIhWOUjgKIiJsS3wpokVjQcxJNwqxkv/A/8Clav4f9g0Xkg0ETVCo6AXf1AxWhMqKje1cPHHpaZN+XiYrdksu/vu7L5vi8n7TTbZ2ZnvPM93ZmfmmRkYYYQRRvg/IaQS1ABMA6eBx4BHgbGOfmwCt4GbwIfAUgjBjnWWQw3qK+oNh48V9eWs0QYqYq/63jYIKOID9aFBiXhQ/WYHRGxhSd3bz89dfUQEYAE4PpBWaYZLwGvAYpbuAfN2+c2MY2I7cbFgfzGXd6bO18oeyVrgzdat0A6fFtKf5N7P1fVK3a81DTzexasWeGHrJXP6ZC7vCeJvVor7aio93dGpVWAZ+D1LHwAmgf01nBfVRWJPnCQnLOfTUpIX6nyLf3wz482od/W2ukt9Rl3Iyqbi7SQRmdFLiUauq1MJ9R9Tf0y0cbGqvroxsjtB9xVgJoTwXVNCCOFb4GngswQ791dl1K4jDbECzIYQ/ixmqONqL3vGi/khhD+AWeDGAPwoh3q5QVdvqkdLuFPG8GIjV3ZDvaBOlpTv2WzMXB6WkPkS3hl1rYazpr5UwlvYSSEzBc5UHxF5MRMF7okuQrqMkVXgq8K3c8CeBtw9wFuFb18At9o600XIcgjhzlZCfRg4lcA/ZW4CyOpabutMFyG/FdKHqY8UitgNHOpTZ2N0EVIM4NpsTYuc1qF6FyEHCumfgY0E/gbwS+HbwbbOdBEyaS6eCiH8BVSGECX4OITw91ZCHQMmasrXoouQ/cQQI4+zwD8NuGvAG4VvM8QTmVboGqK8mk+EEL4H5qgXswbMhRB+qKtrYGi4IG6qx0q4E8ZwZD1Xdl19X32qpPy0eqfLgthViMZQ/JGKOsbV49lTeqyj7lN/amhrqEJUr1SJ6WNjn/p5gp1WIUrKVPo88KXa+NhInSaGOM8l2FmvyqgTsppgAOAIcNUYxZ6wfKs7pj6rvkMUcTjRRqVPdSHFzUQjEBtmLntuq8vAr8QV+yBxnWg9xXL3AvofKkOCrOu/7mB0GOiFEK6VZdQJCcRt7JFheZWIFeDJquuGyjGSEc4Oy6sWeL31nYnxTuTdhOlxWDjfuRmMdyNLOyjiqvpAZyE5MTvRM+cHJiInJhhPSFa2QcB1dTbFv7aXoT3igfIhYjg/iMvQW8TN2UfAtaFdho4wwggj3BP4F8SQMYOYcy12AAAAAElFTkSuQmCC"></a> </div> <div class="social-wrapper"> <!--图虫--><a style="margin-right:15px;margin-top:1.5px;" href='https://tuchong.com/5634772/'><img height="17px" src="https://s1.tuchong.com/content-image/201904/af8f36bc5c647dfd3007907d17d4e053.png"></a> <!--专栏--><a style="margin-right:15px;margin-top:1.9px;" href='https://cloud.tencent.com/developer/column/79519'><img height="17px" src="https://cdn.jsdelivr.net/gh/TianZonglin/tuchuang/img/yunjia.png"></a> <!--zhihu--><a style="margin-right:16px;margin-top:1.8px;" href='https://www.zhihu.com/people/tian-zong-lin-82'><img height="18px" src="https://cdn.jsdelivr.net/gh/TianZonglin/tuchuang/img/zhihu.svg"></a> <a style="font-size:17px;margin-top:3px;" href="/atom.xml" class="fas fa-rss" target="_blank" rel="external nofollow noopener noreferrer"> </a> </div> <br/> <div class="social-wrapper"> <img width="20px" height="12.89px" style="border-radius:1.5px;" src="https://cdn.jsdelivr.net/gh/TianZonglin/tuchuang/img/20200305230433.png"/> </div> <!---end--> <!---这里只留Aplyer--> <% layout.forEach(function(item){ %> <% if (item == 'aplayer') { %> <div class="aplayer-container"> <%- partial('../_third-party/aplayer', {post: null, where: 'footer'}) %> </div> <% }%> <%}) %> <!---end--> <!---保留老的footer调用--> <div> <%- __('footer.use') %> <%- __('footer.theme') %> <%- __('symbol.period') %> </div> <div> <%- markdown(__('footer.license')) %> </div> <script type="text/javascript"> document.write(unescape("%3Cspan id='cnzz_stat_icon_1278641089'%3E%3C/span%3E%3Cscript src='https://s4.cnzz.com/z_stat.php%3Fid%3D1278641089%26online%3D1%26show%3Dline' type='text/javascript'%3E%3C/script%3E")); </script> <div class='copyright'> <br> <span>本站已运行<span id="showDays"></span></span> <script> var seconds = 1000; var minutes = seconds * 60; var hours = minutes * 60; var days = hours * 24; var years = days * 365; var birthDay = Date.UTC(2020,02,27,14,00,00); // 这里设置建站时间 setInterval(function() { var today = new Date(); var todayYear = today.getFullYear(); var todayMonth = today.getMonth()+1; var todayDate = today.getDate(); var todayHour = today.getHours(); var todayMinute = today.getMinutes(); var todaySecond = today.getSeconds(); var now = Date.UTC(todayYear,todayMonth,todayDate,todayHour,todayMinute,todaySecond); var diff = now - birthDay; var diffYears = Math.floor(diff/years); var diffDays = Math.floor((diff/days)-diffYears*365); var diffHours = Math.floor((diff-(diffYears*365+diffDays)*days)/hours); var diffMinutes = Math.floor((diff-(diffYears*365+diffDays)*days-diffHours*hours)/minutes); var diffSeconds = Math.floor((diff-(diffYears*365+diffDays)*days-diffHours*hours-diffMinutes*minutes)/seconds); document.getElementById('showDays').innerHTML=""+diffYears+"年"+diffDays+"天"+diffHours+"小时"+diffMinutes+"分钟"+diffSeconds+"秒"; }, 1000); </script> <%- markdown(theme.copyright) %> <br><br> </div> <!---end--> </footer> <% } %> <script>setLoadingBarProgress(80);</script>
除上述之外样式同样要修改:
修改位置:
~\volantis\source\less\_article.less (2 hits)
Line 259: footer {
~\volantis\source\less\_footer.less (1 hit)
Line 1: footer {~\volantis\source\less\_article.less 1 2 3 4 5 6 7 8 footer { padding : 0 ; text-align : justify; color : #fff ; font-style : italic; margin : .6em 0 ; cite {
~\volantis\source\less\_footer.less 1 2 3 4 5 6 7 8 9 10 11 12 13 14 15 16 17 18 19 20 21 22 23 24 25 footer { position : relative; padding : 40px 10px 25px 10px ; width : 100% ; color : #fff ; margin : 0px auto; font-size : 14px ; overflow : hidden; text-align : center; ~ ~ a { color : #fff ; padding : 0 ; .enable-trans (); & :hover { color : @color_text_highlight ; } ~ ~ .copyright { margin-top : @gap ; font-size : 14px ; }
Blogger模块也添加头部 ~\volantis\_config.yml 1 2 3 4 5 6 7 8 9 10 11 12 13 14 15 widget: - id: blogger class: blogger display: [desktop] avatar: https://cdn.jsdelivr.net/gh/TianZonglin/tuchuang/img/oiuydtsrk.gif header: icon: fas fa-user-circle title: 关于博主 jinrishici: false social: false
之后,去模块源文件内插入代码。
~\volantis\layout\_widget\blogger.ejs 1 2 3 4 5 6 7 8 <%- partial('_pre' ) %> <section class "widget <%- item.class %> <%- page.widget_style %> <%- page.widget_platform %>" > ---- 添加头部 ---- <%- partial('header' , {item : item}) %> <div class 'content' > ~ ~
Blogger图不必非得是方形 位置:
~\volantis\source\less\_side.less (1 hit)
Line 124: &.blogger{~\volantis\source\less\_side.less 1 2 3 4 5 6 7 8 9 10 11 12 13 14 15 16 & .blogger { .enable-trans (); .content { padding : 0 ; div .avatar { display : flex; justify-content : center; } img { padding : 0 ; margin : 0 ; display : flex; justify-content : center; width : @width_sidebar ;
修改页头Logo的样式 现在页头采用自带logo。
~\volantis\source\less\_header.less 1 2 3 4 5 6 7 8 9 10 11 12 13 14 15 16 17 18 19 20 21 .logo { font-size : @fontsize_logo ; font-family : @fontfamily_logo ; @media (max-width : @on_phone ){ padding : 0 @gap ; } & .img { padding : 0 @gap 0 0 ; } img { height : 60% ; } letter-spacing : 0 ; } img .logo { padding : 0px 20px 0px 0px ; margin-top : 13px ; margin-right : 20px ; margin-left : -5px ; }
修改页头下边缘阴影 配合不透明白色,显得更加立体。给人更快速的加载的感觉。
~\volantis\source\less\_header.less 1 2 3 4 5 6 7 8 9 10 11 12 13 14 15 16 17 18 19 20 21 22 23 24 25 26 .l_header { @iconW: 32px ; @iconMargin: 4px ; position : fixed; z-index : 9999 ; top : 0 ; overflow : hidden; width : 100% ; font-size : @fontsize_base ; line-height : @height_navbar ; height : @height_navbar ; overflow : hidden; font-family : @fontfamily_base ; padding : 0 @gap ; margin-bottom : @gap ; box-shadow : -9px 3px 2px 0 rgba(0 ,0 ,0 ,0.1 ); .wrapper { padding : auto @gap ; max-width : @width_container ; margin : auto; .enable-trans (); a .logo { color : @color_text_header ; } }
底部上线PV统计 使用CNZZ的统计。
修改位置:
~\volantis\source\less\_header.less (3 hits)
Line 89: .nav-sub{~\volantis\source\less\_header.less 1 2 3 4 5 6 7 8 9 10 11 12 13 .nav-sub { .logo { font-weight : 600 ; padding : 0 @gap *1.5 ; font-size : @fontsize_base ; font-family : @fontfamily_base ; @media (max-width : @on_phone ){ letter-spacing : -0.5px ; padding-top : 1px ; } }
页头搜索框样式 修改透明度和颜色。
修改位置:
~\volantis\source\less\_header.less (3 hits)
Line 176: .m_search {~\volantis\source\less\_header.less 1 2 3 4 5 6 7 8 9 10 11 12 13 14 15 16 17 18 19 20 21 22 23 24 25 26 27 28 29 30 31 32 33 34 35 36 .input { display : block; font-size : @fontsize_small ; padding-top : 8px ; padding-bottom : 8px ; width : 100% ; color : @color_text_main ; background : rgba(230 , 230 , 230 , 0.72 ); box-shadow : none; box-sizing : border-box; padding-left : @iconW + @iconMargin ; @media (max-width : @on_phone ){ padding-left : @iconW + @iconMargin ; } border-radius : @border_radius_searchbar ; border : 1px dashed transparent; .set-placeholder ({ color : fade(@color_text_main , 50% ); }); & :hover { color : @color_text_in_header ; ~.icon { color : fade(@theme_main , 80% ); } border : 1px solid fade(@theme_main , 60% ); } & :focus { ~.icon { color : @theme_main ; } color : @color_text_main ; background : fade(@theme_main , 15% ); border : 1px solid @theme_main ; } }
代码显示去掉行号 修改位置:
~\volantis\source\less\_article.less (1 hit)
Line 624: .gutter{~\volantis\source\less\_article.less 1 2 3 4 5 6 7 8 9 10 11 12 13 14 15 .gutter { width : 24px ; padding : 0 12px ; display : none; text-align : right; border-width : 0 ; margin-left : 0 ; position : sticky; left : 0 ; background-color : darken(@color_bg_code_block , 5% ); pre { color : fade(@color_text_main , 80% ); } }
修改目录缩进 目录在从三级开始显示时,下一级会空格太多。
修改位置:
~\volantis\source\less\_toc.less (4 hits)
Line 71: .toc-item.toc-level-1 {
Line 77: .toc-item.toc-level-2 {
Line 83: .toc-item.toc-level-3 {
Line 89: .toc-item.toc-level-4 {~\volantis\source\less\_toc.less 1 2 3 4 5 6 7 8 9 10 11 12 13 14 15 16 17 18 19 20 21 22 23 24 25 .toc-item .toc-level-1 { .toc-child a { padding-left : 0px ; font-weight : normal; } } .toc-item .toc-level-2 { .toc-child a { padding-left : 0px ; font-weight : normal; } } .toc-item .toc-level-3 { .toc-child a { padding-left : 11px ; font-weight : normal; } } .toc-item .toc-level-4 { .toc-child a { padding-left : 23.8px ; font-weight : normal; } }
修改阅读更多按钮 默认的感觉 padding 有点大,不协调。
修改位置:
~\volantis\source\less\_article.less (1 hit)
Line 303: .readmore {~\volantis\source\less\_article.less 1 2 3 4 5 6 7 8 9 10 11 12 13 14 15 16 17 18 19 20 21 22 23 24 .readmore { font-family : @fontfamily_base ; font-size : .8em ; letter-spacing : .1em ; margin-top : @gap ; a { text-decoration : none; display : inline-block; vertical-align : middle; line-height : 1.8rem ; font-weight : bold; background-color : @theme_main ; padding : .2em .8em ; color : @color_text_in_header ; border-radius : @border_radius /2 ; .enable-trans (); & :hover { background : darken(@theme_main , 10% ); } & :active { } }
Blogger组件样式修改 修改圆角的程度。
修改位置:
~\volantis\source\less\_side.less (1 hit)
Line 122: &.blogger{
~\volantis\source\less\_side.less (1 hit)
Line 17: .widget{~\themes\volantis\source\less\_article.less 1 2 3 4 5 6 7 8 9 10 11 12 .content { background-color :white; text-align : justify; padding : @gap /2 0 ; max-height : ~"calc(100% - @{height_navbar} - 12.5 * @{gap})" ; max-width : 100% ; border-bottom-right-radius : 8px ; border-bottom-left-radius : 8px ; ~ ~ }
Tab键入的code块样式 修改位置:
~\themes\volantis\source\less\_article.less (4 hits)
Line 1: .article {
Line 337: &.article-tags {
Line 723: .article {
Line 858: .article-entry{~\themes\volantis\source\less\_article.less 1 2 3 4 5 6 7 8 9 10 11 12 13 14 15 16 17 18 19 20 21 22 23 24 25 26 27 28 29 30 31 32 code { font-family : @fontfamily_code ; padding : 3px 3px 0px 3px ; margin : 0px 1px ; vertical-align : center; border-radius : 2px ; border : 1px solid fade(@color_bg_code , 20% ); font-size : @fontsize_base * .8 ; background : @color_bg_code ; color : @color_text_code ; @media (max-width : @on_phone ){ font-size : @fontsize_base * .8 * .95 ; } } ~ ~ @media (max-width : 580px ).article code { font-size : 13.4px ; } .article code { font-family : Menlo,Monaco,courier,monospace,"Lucida Console" ,'Source Code Pro' ,"Microsoft YaHei" ,Helvetica,Arial,sans-serif,'Ubuntu' ; padding : 3px 3px 0px 3px ; margin : 0px 1px ; vertical-align : center; border-radius : 2px ; border : 1px solid rgba(255 ,248 ,240 ,0.2 ); font-size : 14px ; /* background: #FFF8F0; *//改动 color : 0054 be; }
修改横向滚动条的样式 位置:
~\volantis\source\less\_article.less (1 hit)
Line 711: &::-webkit-scrollbar-thumb {
~\volantis\source\less\_article.less (1 hit)
Line 704: &::-webkit-scrollbar-track-piece {~\volantis\source\less\_article.less 1 2 3 4 5 6 7 8 9 10 11 12 13 14 15 16 17 18 19 20 21 22 23 24 & ::-webkit-scrollbar { height : @border_radius_line ; width : 3px ; } ::-webkit-scrollbar-thumb { background-color : #e1e1e1 ; } ::-webkit-scrollbar-track { background-color : #f3f3f3 ; } html { ::-webkit-scrollbar { -webkit-appearance : none !important ; width : 3px !important ; height : 3px !important ; } ::-webkit-scrollbar-thumb { background-color : #aeaeae !important ; } ::-webkit-scrollbar-track { background-color : black !important ; } }
右侧添加地图小插件 我是直接借用的 qrcode 插件的代码。直接修改以下文件:
~\volantis\layout\_widget\qrcode.ejs 1 2 3 4 5 6 7 8 9 10 11 12 <%- partial('_pre' ) %> <section class "widget <%- item.class %> <%- page.widget_style %> <%- page.widget_platform %>" > <%- partial('header' , {item : item}) %> <div style='padding:5 5 5 5;height:104.5px;' > ---- 添加地图插件 ---- ---- 注意调整宽度 ---- <div style="display:inline-block;width:209px;" > <script type="text/javascript" src="//rf.revolvermaps.com/0/0/7.js?i=51glt95x6ef&m=0c&c=ff0000&cr1=54ff00&crb1=54ff00&br=12&sx=0&rs=100&as=100&ds=0&cw=ffffff&cb=ff0000" async ="async" ></script> </ div> </div> </ section>
以下是旧版博客的日志 如需参考,请移步 old.cz5h.com 。
搭建清单
框架: HEXO主题: Indigo模板: EJS托管: Github Pages图床: 阿里云OSS(作业部落)、微博相册文档: Google Docs文件: Nginx(Local Server)云盘: 可道云(Synology NAS)订阅: FeedEK弃用: APlayer、七牛云
创建记录(根目录)
1 2 3 4 5 6 7 8 9 10 11 12 13 14 15 16 17 18 19 20 myblog\source\CNAME 域名映射 myblog\source\robots.txt 百度、谷歌的爬虫规则 myblog\source\plugin-shake\harlem-shake-style.css 本地化资源文件 myblog\source\categories\index 开启后自动生成 myblog\source\tags\index 开启后自动生成 myblog\source\pdf\... 本地化文章显示的pdf myblog\source\other\page_log 建站日志页面 myblog\source\other\page_share 图片收藏页面 myblog\source\other\page_gif 动态图页面 myblog\source\other\page_bground 壁纸页面 myblog\source\other\page_comment 全站评论页面 myblog\source\torrent\neubt BT资源文件分享页面 myblog\source\feedek\feedread 显示订阅内容页面 myblog\source\videos\look 视频资源左右滑动展示 indigo\source\js\graph.js 获取Json数据并构造svg元素 indigo\source\js\barry.js 简单的拦截某些页面的访问 indigo\source\js\av-min.js 本地化 indigo\source\js\Valin.js 本地化 indigo\layout\_partial\post\wordcount.ejs 字数统计
文件改动记录
1 2 3 4 5 6 7 8 9 10 11 12 13 14 15 16 17 18 19 20 21 22 23 24 25 26 27 28 29 30 31 32 33 34 35 36 37 38 39 40 indigo\_config.yaml 配置文件|内置功能的配置 indigo\source\img\... 资源文件|头像和打赏图片等 indigo\layout\_partial\menu.ejs 左侧面板|添加各功能入口 indigo\layout\_partial\footer.ejs 底部样式|添加 Host by indigo\layout\_partial\plugins\site-visit 站点访问|去除数量显示 indigo\layout\_partial\plugins\page-visit 页面访问|去除数量显示 indigo\layout\_partial\plugins\google-analytics.ejs 谷歌分析|加入解析路径 indigo\layout\_partial\plugins\baidu.ejs 百度统计|添加自定义匹配项 indigo\layout\tag.ejs 标签显示|修改样式 indigo\source\css\style.less 主要样式|修改背景纹理 indigo\layout\_partial\post\toc.ejs 构造目录|修改模块透明度及边框 indigo\layout\_partial\post\nav.ejs 前进后退|修改模块透明度及边框 indigo\layout\_partial\plugins\gitment.ejs 评论模块|修改模块透明度及边框 indigo\source\css\_partial\article.less 文章样式|修改目录焦点变化的跟随高度 indigo\layout\_partial\script.ejs 全局添加|添加自定义JS或者CSS indigo\layout\page.ejs 文章页面|修改底部ABOUT模块内容 indigo\layout\post\copyright.ejs 文章页面|自定义底部标注模块内容 indigo\layout\_partial\header.ejs 顶层浮栏|下滑后修改标题居中,添加头像 indigo\layout\post\copyright.ejs 文章页面|自定义底部标注模块内容 indigo\layout\_partial\header.ejs 顶层浮栏|下滑后修改标题居中,添加头像 indigo\layout\_partial\plugins\valine.ejs 评论模块|新添加Valine评论 indigo\layout\_partial\post\comment.ejs 评论模块|接入扩展的Valine插件 indigo\source\css\_partial\article.less 文章样式|修改最后的评论模块的Section风格 indigo\layout\_partial\head.less 全局头部|全部页面<head>添加GoogleAdsense indigo\layout\page.ejs 自定页面|Pages添加底部about模块的控制变量 indigo\layout\_partial\menu.ejs 左侧面板|在_config中添加标签云控制变量 indigo\source\css\_partial\highlight.less 代码模块|调整代码区域字体大小行间距 indigo\source\css\_partial\variable.less 代码字体|更换代码块字体@font-code indigo\layout\_partial\archive.ejs 归档分类|去掉两部分显示时的tags indigo\layout\_partial\head.ejs 首页结构|规范首页meta信息及整体代码结构 indigo\source\css\_partial\article.less 文章样式|修改image-bubble(-35->0) indigo\layout\_partial\head.ejs 页面头部|在加载页面前加载barry.js indigo\source\css\_partial\article.less 标注词组|修改词组标注样式 indigo\source\css\_partial\highlight.less 代码模块|修改代码段样式,pre和gutter indigo\layout\_partial\head.ejs 全局头部|添加自定义Js和Css代码段 indigo\layout\_partial\menu.ejs 全局音乐|利用frameset和catch检测跳转实现 indigo\layout\index.ejs 主页列表|添加首项为已有全部评论
2月27日 换新主题 Volantis。
2020年2月 12月3日 头像下方添加个人社交信息
2019年12月 7月12日 更新友链页面的样式
7月11日 侧边栏添加多个功能页,整合 NAS和自己服务器的应用
7月2日 更换新的.COM域名
2019年7月 5月10日 去除音乐,视频、下载页面失效(七牛云到期)
2019年5月 6月21日 利用多frame添加全局音乐的播放,暂不清楚对SEO的影响
6月20日 添加视频播放页面 ,未适配移动端
6月16日 使用LeanCloud 实现分享下载页 的下载计数
6月10日 利用Hexo原生API添加生成相关文章
2018年6月 5月21日 添加字数统计 ,本地化Valine
5月18日 对文件压缩上传,参见minifier ,加速动画效果
5月17日 添加rss加载gif及页面的简单访问拦截
5月16日 去掉音乐,新增我的订阅 和代码挂件
5月12日 现在用QSunSync 来完成本地资源云同步
2018年5月 5月11日 在资源分享 栏添加BT资源分享 页面
4月21日 添加 Google 广告支持,添加留言中心 栏目
4月20日 停用gitment评论,新增valine评论支持,详见这里
4月15日 修改侧边栏项目,汇总相关文档,添加资源分享 栏目
2018年4月 12月27日 引入JQuery和自定义CSS代码,未发现与nodejs的兼容问题
12月19日 本页面添加文件修改记录;改动了各模块的显示样式
12月15日 功能异常,修复未果,故进行了一次主题重置,详见这里
12月10日 添加背景纹理,美化留白
12月4日 侧边栏添加图片收藏栏目 ,使用七牛云做图床
2017年12月 11月20日 侧边栏整合标签(书签)云插件,删掉原有标签选项
11月18日 动次打次添加切歌,使用七牛云做音频存储
11月17日 SEO优化,开启百度爬虫推送,使用google webmaster
11月7日 添加Google Analysis,添加百度统计
11月4日 更换托管源,托管在Coding
11月3日 文章整理完毕,做第一次发布
2017年11月 10月29日 侧边栏添加建站日志
10月27日 添加gitment评论,添加rss等基础功能
10月26日 更换indigo主题,添加high一下功能
10月24日 托管在Github并绑定域名,站点正式上线
10月23日 站点搭建完毕,域名申请完成
10月20日 正式接触到Hexo,着手搭建站点
2017年10月
😒 留下您对该文章的评价 😄


 WEB / RESUME
 Page Analyse
 全站点状态监控!


